Thursday, October 9, 2014

PUMPKIN FUDGE

I wanted to make pumpkin fudge.  But here's the catch...I wanted to make fudge with wholesome ingredients... not health food ingredients...but with ingredients --that at the very least, contain words I could pronounce...
After a few (or many...who's counting??) batches of mistakes... and even some outcomes that could not be categorized as having any fudge-like qualities... We have a winner!!

This turns out to be a new take on an old family recipe...many thanks to my parents for digging through the old cookbook to find this special treasure, neatly tucked away... just waiting for it's debut in the
blogoshpere!
This fudge takes 2 minutes in the microwave to prepare.  It's rich, creamy and 
full of the fall flavor that I was hoping for
...and made with all natural ingredients... 
A-m-a-z-i-n-g... I know... !!

I am so thrilled..., finally a fudge recipe that works!!...and I am sure my army of pumpkin "fudge" taste-testers are thrilled too.
Great news...there is a peanut butter version (it rivals...if not beats the best peanut butter fudges I've ever tasted) I will post the peanut butter fudge recipe shortly... just in time for all those holiday dessert trays... cookie swap parties...or just to nibble on....

On with the recipe, I hope you enjoy it as much as we do.

What you will need:

8 x 8 baking dish (or something close to those dimensions)
waxed paper, lay a piece across in each direction, creating "handles"-- this will be awesome and come in handy when it's time to remove the fudge from the pan.
cooking spray or butter to lightly grease the waxed paper.
***
pumpkin- 1/4 cup (I measured my pumpkin puree in a dry-measuring cup) I used Libby's.  Be sure it is the 100% pumpkin and NOT the pumpkin pie mix.
2 Tablespoons milk, -I used 2%
1/2 of a stick of butter - I used Land O Lakes
1 teaspoon vanilla 
***
4 cups confectioners' sugar
1 teaspoon pumpkin pie spice
1/8 teaspoon allspice
pinch of salt

This is one of my favorite kitchen tools...it works well with this recipe.
Line pan with waxed paper.  Lightly spray or grease waxed paper, set aside.

In a medium mixing bowl add confectioners' sugar and spices, set aside.
Confectioner's sugar and spices waiting in a large Pyrex measuring cup.
In a microwaveable bowl or large measuring cup, add pumpkin, milk, butter and vanilla.  Microwave the mixture for 2 minutes with a paper towel resting on top of container to catch any spatters. 
Pumpkin puree, butter, milk and vanilla heating up...CAUTION: It will get very hot!
  After two minutes, the mixture will be very hot. (If your mixture isn't hot and bubbly at the end of 2 minutes, microwave for an additional 30 seconds - 1 minute  or until until it is hot and bubbly).  Carefully remove from the microwave and stir the pumpkin/milk/butter/vanilla mixture until emulsified.
Emulsified and very warm pumpkin /butter mixture being poured into waiting sugar/spices.
Add the now, very warm emulsified pumpkin mixture to the waiting sugar and spice mixture.
How the fudge looks once smooth and combined.
Stir until all lumps of sugar are gone and the mixture is smooth and shiny.
Waxed paper... I nearly ran out on this last batch (big surprise) since I made so many practice batches.  Make sure the waxed paper overhangs the edges for handles...Yes, foil will work too....
Quickly pour the fudge into the prepared pan.  Let rest at room temperature for 30-40 minutes until mostly cooled, then refrigerate.

(TIP: If you work quickly, and pour the warm mixture into the pan, the top of the fudge will remain smooth...Getting the fudge into the pan while it is still warm and pours nicely is the best bet for the beautifully smooth top surface,  If for some reason the fudge does not pour out nicely, smooth the top of the fudge with an off-set spatula.)
Chilled fudge, just cut into small pieces.
After refrigerated for about an 1 hour the fudge should be set.

Lift the fudge from the pan using the handles of the overhanging waxed paper.

On a cutting board, cut fudge into small 1 inch or smaller pieces.  Store covered in the refrigerator. For dessert trays, remove from refrigerator and plate 30 minutes before serving.
I love any occasion to fancy up a dessert... Using these darling seasonal miniature baking cups, makes for an adorable way to serve pumpkin fudge AND a great way for guests to enjoy their pumpkin fudge!

P.S.
If you LOVE the fall flavors and pumpkin
give the TWO-Time Best of Show Pumpkin Cake 
with Cream Cheese Frosting a try... 
Click here:


Click here:

...and to wash it all down ...(not really...ahem...) 
Try this Bourbon & Apple Cinnamon Cocktail...
a true fall favorite around here.

{Thank you for stopping by...I'm glad you did}

LINKED TO:


Monday, October 6, 2014

ANTIQUED ROCKER | A spray paint Makeover!!

Sometimes when I spy a special furniture piece in a thrift store.... my heart skips a beat.  Do you ever feel that way when you happen upon just the right 'something' at just the right time??  Usually, I can imagine how amazing a makeover might be with a little creative elbow grease... 
 I love those moments...   
Well, this little rocker, provided one of those 'heart-skipping' moments... I knew right away what she could be and how to transform her into a uniquely antiqued, one-of-a-kind piece.
Can you believe all I used was black, satin-finish Rust-oleum spray paint!? Yes, spray paint!  It was so easy to transform this rocker!
 I used a little 100 and 200 grit sandpaper to rub the areas of the chair that would likely get the most use over time, creating an aged patina.  It helped that the chair was already stained a cherry-brown color, which shows through nicely in the areas where I antiqued it. 
TIP: When working with spray paint, follow all instructions on the can.  Use eye and breathing protection as required.  Be sure to use light paining strokes 8-10 inches away from the surface you are painting.  It is far better to give the surface 2-3 coats of paint, than to have one thick, sticky and drippy coat of paint. The final product will be beautiful... by using a light hand when applying coats of paint and allowing time to dry in between applications.
TIP:  I found a great trick...using a few drops of water, helped to remove just the right amount of paint without making the surface too scratched up.  I even found that lightly dipping my sandpaper into the water worked too...  After I started using the water, it was incredibly easy to get the look I was after.
I cannot sing the praises of thrift stores and second hand furniture shops enough.  Not every single day, will you find great makeover candidates... but on occasion, rare and wonderful items are there.  I suggest keeping a Pinterest page or a notebook of furniture pieces you would like to add to your home... many times those pieces may become available (albeit not in the right color) but with a little effort, you can have what you are searching for...  Those shops, tag sales, and auctions really are the best places to find treasures.  Sometimes you just need a little imagination and maybe a can or two of spray paint and you will have created a one-of-a-kind find, all for your very own.


I love the look of this nursing rocker...it has just the right amount of chippy paint.  

Is painting furniture right for you??

I know there tends to be two very distinct camps when it comes to the topic of painted furniture.  Those who love painted furniture {which can include: cabinets, center islands, wood work, trim, built ins and even decking and  gasp...floors}  Then, there is the opposing camp, those that love the beauty and luster of wood, wood grain and stained finishes, this group could not dream of painting a wood surface; not ever.  

Well, here is the great news on this hot button issue: no one is correct!... Everyone is entitled to paint or not paint their furniture. It really boils down to preference...  and style differences... 

I totally get that... we all have different tastes and that is perfectly fine.  Our homes should all look different!
I tend to like a little of each in my home...mixing natural wood and painted finishes creates interest and character... but like all things in life, it has to suit you and who you are.
"Variety is the spice of life" they always say!

I have found that sometimes, a coat of paint (even ...gasp...spray paint) can breathe new life into an old outdated piece.   

The furniture I paint isn't headed to the Smithsonian anytime soon...I would  always think twice before painting a high quality heirloom piece of furniture --  Luckily, (or unlucky as the case may be) I don't have too many of those high end pieces of natural wood furniture to worry about... For me, I don't mind a painted piece of furniture now and then, I love white painted mill work... but I understand that it isn't every ones cup-of -tea... and I'm OK with that too.  Creating a space you love and making your home yours is all about surrounding yourself with things you love; which for me, includes transforming the occasional bit of furniture with paint.  

So, go out there! Find some great makeover candidates and paint...or don't paint!!?... 
But whatever you do, have fun making your house a home.


Thursday, October 2, 2014

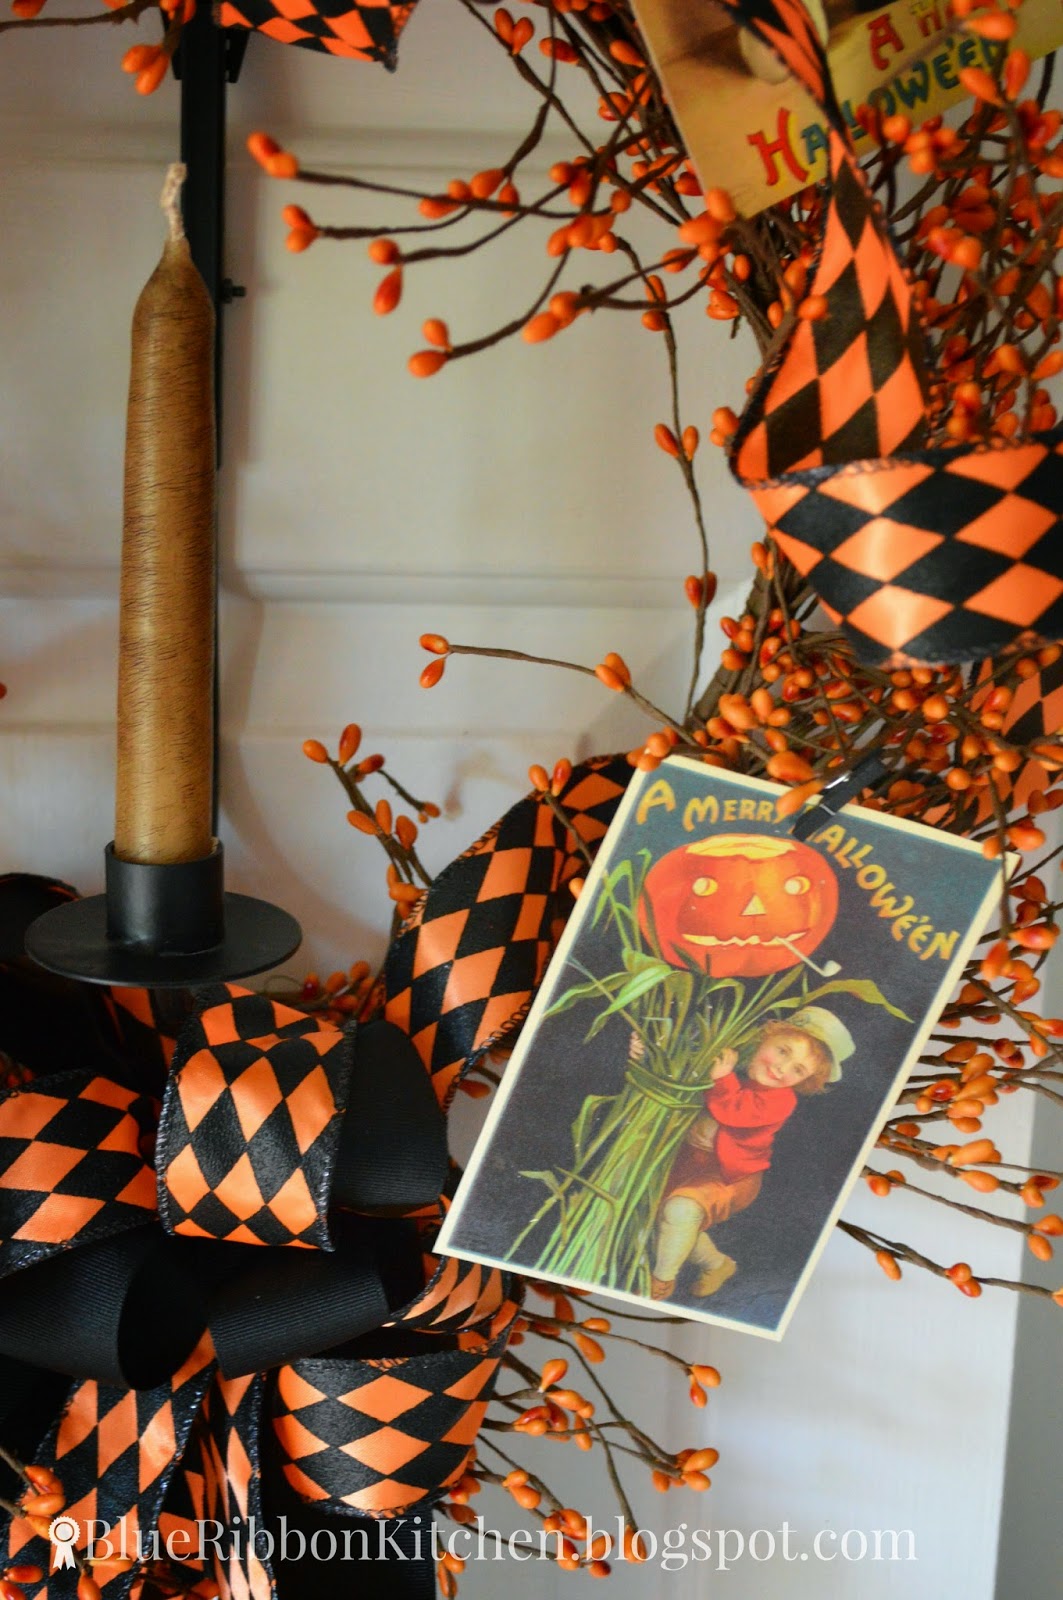
HALLOWEEN POSTCARD WREATH


I LOVE old postcards...and I  l-o-v-e  decorating with them too.


The artwork is truly amazing...

the colors are vibrant, the images are timeless.  

One of the things I love most about old postcards is the connection to the past.  


I love deciphering the carefully inked well wishes, 
sent from one person to another. 

I marvel at the postmarks and the postage stamps... 

I wonder how ever did these cards arrive to their correct destination?? 
-- with only a first name and a town listed as the mailing address??  
To me, each one is a miniature work-of-art, 
and quite frankly it astounds me that well over 100 years later, 
these postcards remain in excellent condition!
I love using a little bit of that history in my holiday decor, 
it marries the past to the present and reminds us of the connection that we have to the generations before us... 

They celebrated the holidays and seasons...just as we do... it's tradition, and I like that.
I was a little concerned about the project I had in mind... 
My dad picked up a set of adorable and very hard to find 
Halloween postcards for me at a local auction.  

I knew almost immediately what I wanted to do with them, but I was unsure if it was legal... really...

I wanted to color copy the postcards, (for personal use only)...
After a little research on the topic, I was happy to discover that I was still a law-abiding citizen and my crafting could commence!  

Here is an article on copyright information if you 
have similar concerns regarding the use of old postcards and photos: 

Have no fear... The Halloween Postcard Wreath project was a success.


This is what I did to make the Halloween Postcard Wreath:

Using vintage postcards, I color copied them.  
This way I can preserve the integrity of the originals... 
while still using "postcards" in my design.  It was very inexpensive to copy them. 
 I used off-white card stock and 10 copies cost around $4.

I carefully cut of the copied images.

Using scrap booking miniature clothespins in Halloween colors,
I attached the cards to the wreath.
A little holiday ribbon and the Halloween Postcard Wreath
 is a one-of-a-kind Halloween decoration.

LINKED TO:

Wednesday, October 1, 2014

DRIED HYDRANGEAS | wreath & centerpiece

I was gifted with an abundance of hydrangea blooms this year.  We have the Annabelle type of hydrangea growing all over the backyard.  The Annabelle's bloomed their little hearts out this spring and summer.
I felt obligated to use up some of the gorgeous, and already mostly dried blooms.  I snipped so many, I wasn't sure I could use them all... in a responsible way...
Really-- there is a limit... to a reasonable amount of dried hydrangeas one should probably use and/or display....and I was getting dangerously close to exceeding that limit!
 Using a straw wreath form, I poked the hydrangeas into the form.
 I used my trusty glue gun to secure them...
I added a sage bow...a sweet addition to the wreath, without being to fussy.  
TIP: Working within the same color palette can add visual interest. Choosing a very different colored ribbon as an accent can sometimes become distracting.
Guess what?  I still had gobs of leftover hydrangeas... So, I decided to make a quick centerpiece for the  kitchen center island.  I used faux pumpkins and gourds...  I have a hard time keeping the real miniature pumpkins and gourds from getting spots when they are displayed inside the warm house... The faux pumpkins look very realistic, they are a reusable, one-time investment and they don't spoil; three great reasons to give them a try.
I'm finally out of dried hydrangea blooms!!