Wednesday, June 30, 2021

Layered Taco Flag Dip


 Layered Taco Flag Dip

The ultimate make-ahead patriotic dish for a crowd!! Fun taco flavors and it’s delicious!!


Use a 9X13 dish-fill horizontally… like a flag.


Tips: 

*An off-set spatula is a great tool for this recipe, helps to get in the corners.


*Be sure to spread the layers to the edges evenly so the flag is uniform and the finished dish will look even and flag-like.


Layered Taco Flag Dip


Use a 9X13 dish-fill horizontally, like a flag.


Ingredients:

Refried Beans-16 ounce can

Black Beans-15 ounce can-drained and rinsed

Roasted Corn-1 cup kernels 

Garlic Salt- 1/2 teaspoon 

Onion-1/2 cup chopped red onion or scallions

Sour Cream-12 ounce container 

Taco Seasoning-1 Tablespoon (1 packet)

Chunky Salsa-16 ounce jar

Shredded Cheddar Cheese-2 cups

Shredded Monterey Jack-2-3 cups

Cherry Tomatoes-12-ounce container or about 18-20 cherry/grape tomatoes 

Black Olives-6 ounce can whole or sliced olives-drained


((Additional optional layers:))

Prepared Guacamole 1 cup

Shredded lettuce 1-2 cups

Mild JalapeƱo slices 1 small jar-drained

Green chilies 1 small can


Layer 1: Place refried beans in  a microwave safe dish and heat in the microwave for 1 minute, stirring well, refried beans spread much better when warm.  

Spread refried beans in the bottom of a 9x13 dish.


Layer 2: Rinse and drain black beans, sprinkle on top of the refried bean layer.


Layer 3: Roasted corn, either grill corn on a grill 5-7 minutes until roasted or cook frozen kernels in a dry skillet 4-5 minutes, until golden and lightly browned-stirring often.  Cool the corn.  Remove kernels from the cob-if using. Sprinkle corn on top of the black beans.

Sprinkle corn with garlic salt.


Layer 4: Sprinkle chopped onion


Layer 5: Stir together sour cream and taco seasoning. Spread on top of onion layer.


Layer 6: Pour chunky salsa on top of sour cream, spread evenly.


Layer 7: Add shredded cheddar cheese.


Layer 8: Add shredded Monterey Jack cheese.


Layer 9: Slice cherry tomatoes lengthwise.  Place in rows (4) on top of the Monterey Jack sliced side down. (See photo)


Layer 10: Add a square (top left) of drained black olives or black olive slices. 


Layer 11: extra fancy-optional: Using a piping bag, pipe on sour cream stars with a star decorating tip.


Cover dish with plastic wrap, and refrigerate 3 hours-overnight for best flavor. Serve with tortilla chips, Frito Corn Chip Scoops or Doritos.


Need More 4th of July Ideas!!?


Have a great weekend… and as always, thank you for visiting the blog!


Best,


Karri


Cherry Hand-Pies


Cherry Hand-Pies

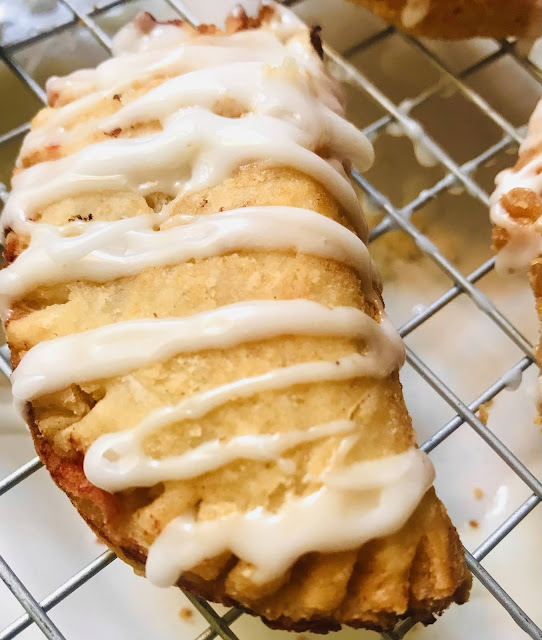
These cutie-pies are a great choice to take to picnics and potlucks… They are so delicious… they won’t last long so be sure to save one for yourself!


Yes, you can absolutely make these with other fillings, apple, blueberry or peach are also great choices. 
Using prepared pie filling is a great time saver… and I used canned pie filling for this recipe and it works beautifully.  If you choose to make homemade filling, make it on the stovetop and then allow to cool before filling hand-pies.  The little hand-pies only cook for a minute or two on each side—different from a whole pie that bakes for an entire hour.  That’s why we need to have an already prepared filling (cooked and cooled)  —or store-bought pie filling will accomplish delivering  a lovely interior and a delicious filling.

Don’t be too generous!


What terrible advice…right??… except when filling hand-pies!! Try to use 1 Tablespoon or slightly less of the filling for each little pie—using too much filling makes it ooze out and makes it hard to crimp edges.  if any small amount of filling tries to escape before frying, simply wipe up with a clean paper towel.  


Cherry Hand-Pies

Karri Perry | Blue Ribbon Favorites 


Pie Dough

2 cups all purpose flour

1-2 Tablespoons sugar

1 teaspoon cornstarch 

1 teaspoon baking powder

1/8 teaspoon cinnamon 

1 tsp. salt

8 Tablespoons unsalted butter

¼ cup cold water


Cherry Filling:

1 12-ounce can Cherry Pie Filling


Or make homemade filling: mix together 2 cups of pitted cherries (sour and sweet) reserve 1/2 cup of the juices. 

1/2 cup granulated sugar

1/2 tsp salt

1/8 teaspoon cinnamon 

1 tsp fresh lemon juice

2 generous Tablespoons arrowroot

In a saucepan, stir the cherries, reserved cherry juice, salt, lemon juice, and arrowroot together on low heat, bringing the mixture just to a boil-the juices will have thickened. For a brighter red-add 1 drop of red food coloring, stir.  Allow cherry mixture to cool to room temperature before using as filling in hand-pies. 


Lemon-Vanilla Glaze:

1 cup confectioner’s sugar

2 Tablespoons fresh lemon juice

1/4 tsp vanilla extract 

Pinch salt


Step 1: Dough: Mix together flour, sugar and salt, cornstarch, cinnamon and baking powder. set aside.  Make pie dough by cutting in (using a pastry blender, a fork or food processor) butter, and into the flour, sugar, salt, cornstarch, cinnamon and baking powder mixture.  The butter should break down into small bits, and dough will look shaggy. Add liquid, sprinkling over the dough, mix together gently until dough comes together.  ** The key to great dough is adding the least amount of liquid, while still creating a dough.  When the water is added and stirred, wait one minute and gently stir again.  Sometimes the flour needs a few seconds to drink in the liquid.  Press the dough together to see if it comes together.  If dough is still dry--add one additional Tablespoon of water if necessary.


Step 2: Using a rolling pin roll the dough 1/4 inch thickness on a floured work surface. I like to use floured parchment paper or floured wax paper.


Step 3: Cut 8-10 four-inch circles from the dough, a large biscuit cutter, cookie cutter or a lid from a plastic container would be good guides and help to make uniform circles. 

Stack dough circles, set aside.

Using a rolling pin, thin each circle just slightly more (spreading them 1/2 inch more) with an additional roll of the rolling pin. The circles may take on a slightly oblong shape-with the extra roll which is fine.  Re-roll any scraps to make additional dough circles.


Step 4: In the middle of each dough circle, place 1 Tablespoon of the cherry pie filling.  Fold the dough over-to cover the filling.  Crimp edges of the dough together by pressing together with fingers.  Using a fork, use the fork tines to finish and secure the edges by pressing dough edges, trim excess.

Place prepared hand-pies on a plate.  Place in the refrigerator while the oil heats.


Step 5: In a medium skillet, on medium heat, fill the skillet with 1-inch of vegetable oil—When oil is hot, gently add 3-4 hand-pies.  

The oil should be warm enough to begin bubbling around the hand pie as it enters the oil.

Carefully fry the hand-pies 1-2 minutes on each side, turning the hand-pies when golden. When golden on both sides, remove from the skillet and place hand-pies on a paper towel-lined tray for 3-4 minutes.  Transfer hand-pies to a cooling rack to cool and to glaze.


Step 6: Using a fork, drizzle the lemon-vanilla glaze on the cooled hand-pies. Serve and enjoy.


Glaze:

In a small bowl add 1 cup confectioner’s sugar, 1/4 teaspoon vanilla and 2 Tablespoons fresh lemon juice.  Mix well.  *If glaze is too thick, add an additional teaspoon of lemon juice or water to reach desired glaze consistency.


Thursday, June 3, 2021

Strawberry-Basil Crostini with Whipped Goat Cheese and Honey


 Strawberry-Basil Crostini with Whipped Goat Cheese 

A perfect summertime appetizer... easy make-ahead deliciousness for you and your guests.

Strawberry Lemonade Ice-Box Pie


 Strawberry Lemonade Ice-Box Pie

Sharing my super easy no-bake recipe, plus tips for getting gorgeous slices!

Make this pie in either a 9-10 inch pie plate or a spring-form pan. (A spring-form pan offers easier slicing)