
Friends are the family we choose for ourselves.

This recipe…is a recipe I would choose…
and I
would share it with all of
my best girlfriends… and this…ahem,
(Spoiler Alert) delicious
cake…it’s a good one.
--And isn’t friendship a beautiful thing?
…and to
have a collection of people,
people we chose, to surround ourselves with in
life??
These friends…they make the good
times greater…
magnifying the happiness.
Friends also make the hard times feel manageable,
by sharing our hurt
and cheering us on…

That’s the way I feel about a lot of my
close
friends as I grow older…
and I am so happy that
I have all these wonderful (old) friends
that I do…each one
different and
complex, fun and fabulous in their
own unique way…
but also familiar
and a little bit
like family, actually, a lot like family.
This “new “cake recipe I’m rolling out
is a cake
that magnifies my happiness…
over and over again…
Old fashioned, and scrumptious…
not
too very different from
many of my dearest friends.
Today, I must introduce you to a close
relative of
one of our favorite cakes...
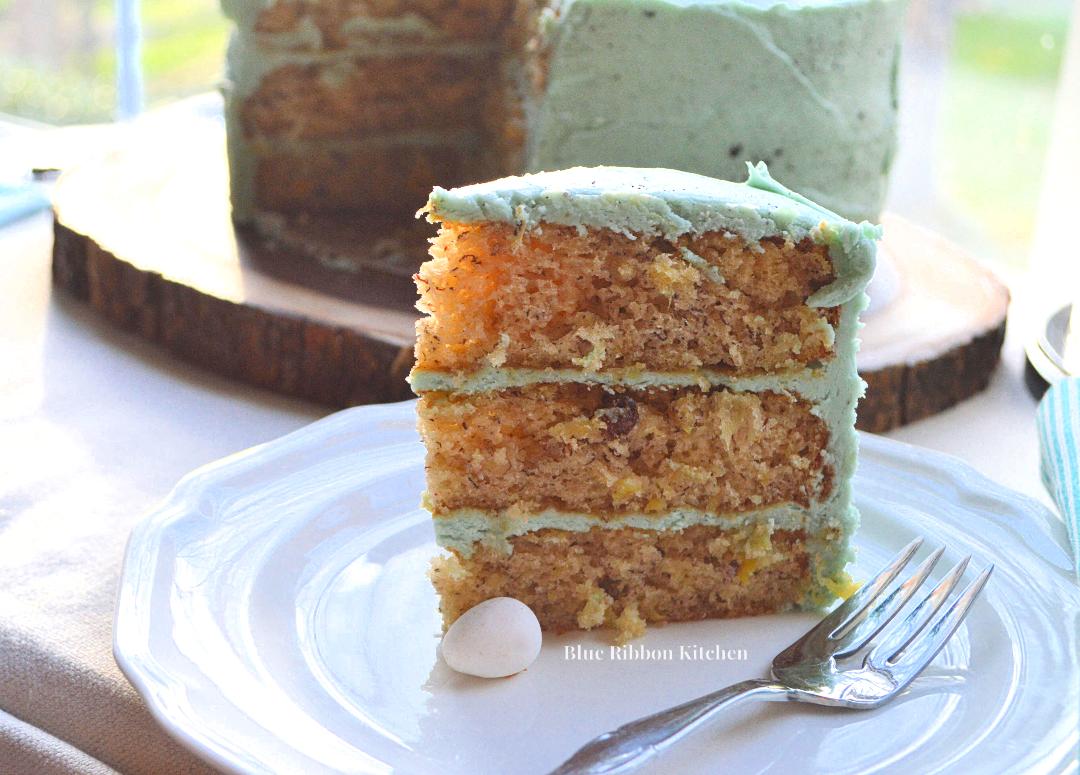
…Please meet Carrot
Cake’s BFF: Hummingbird Cake.
This is a cake you’ll want to
add to your circle of friends…and fast.
Better than a bakery? …check.
Baked with love?
…check.
The kind of cake… you'd be proud to bring
to the
church potluck or a family
picnic?? YES…Yes and yes!!

This is the “cousin”
to our good friend
the carrot cake… these two cake-friends
are made with
similar ingredients…
You can totally see the family resemblance…
and
you can certainly taste it
in the moist crumb and delectable frosting…
but…
like the carrot cake,
a real-winner…
This hummingbird cake will delight you
and
your guests every time you make it!
Every.
single. time.
Hummingbird cake is the perfect
make-ahead dessert
because it tastes
so much better the next day…
It’s good on the first day…but,
--Oh my, the second
day…
some kind of magic happens….all
the flavors come together…
the texture is
perfect… WoW!
For all those who need of a special dessert…
or a
birthday cake…or just want to keep it
for future reference… The recipe
follows:
(I must tell you I had to assure my
son, no actual
hummingbirds
are used in this cake…)

Maybe BEST of all: If you need
to see HOW to make
it with
my BEST BAKING TIPS and baking pointers…
keep reading below the recipe…
A full tutorial follows, with photos!
You’re
welcome, friends!!
Hummingbird Cake
Blue Ribbon Kitchen
Blueribbonkitchen.blogspot.com, Karri Perry
Ingredients
3 cups all-purpose flour
1 teaspoon baking
soda
1 teaspoon baking powder
½ teaspoon ground
cinnamon
½ teaspoon salt
***
3 large eggs- room temperature
2 cups sugar
2 teaspoons vanilla
extract
2 -3 mashed, very ripe medium
bananas- about 1 ½ cups
1 (8-ounce) can crushed
pineapple, WITH juice
***
1 cup vegetable oil
½ cup buttermilk-
room temperature
***
½ cup chopped toasted pecans (optional) - toast them
5 -7 minutes in a 350 degree oven -- to bring out their flavor-
Cool pecans before adding
to cake.
Instructions:
Line 3 (9-inch) round
cake pans with parchment paper; lightly grease. Set pans aside.
Measure the oil and
buttermilk in one medium liquid measuring cup- set aside,
Be sure to give it a quick stir before adding to the batter.
Stir together first 5 (dry)
ingredients. Set aside.
In a large bowl, beat the
eggs and next 4 ingredients (sugar, mashed bananas, pineapple with juice and
vanilla) at medium speed with an electric mixer until combined.
Add ¼ of the flour mixture
alternating with the oil/buttermilk mixture until all of the ingredients are
used. Scrape the sides, making sure all the flour is incorporated. Fold in the toasted,
chopped pecans.
Bake at 350° for about 22-25 minutes or until a wooden pick inserted
in center comes out cleanly. Tops will be golden, and the cake will spring back from a light touch. Cool in pans on wire racks 5 minutes. Remove cakes
from pans AND remove parchment paper. Let
cool completely on wire racks.
Once cakes are room temperature, spread frosting between layers
and on top and sides of cake. Use
toasted chopped nuts to coat the sides of the cake. Refrigerate overnight, up to 24 hours and
then serve.
For cupcakes: Fill cupcake liners half-full with cake batter. bake 350 degrees, center oven rack for 17-22 minutes or until a toothpick comes out cleanly from the center of each cupcake.
Cream Cheese Frosting
Ingredients
2 stick of butter
softened (8 TBS)
2 (8-ounce) package
cream cheese, softened
5 cups powdered
sugar
½ teaspoon salt
2 teaspoon vanilla extract
(Optional: 1 tsp finely grated lemon or orange zest to the
frosting for a fun addition)
(If frosting is too thick, Add I tsp of cream or milk to
frosting at a time to yield desired texture)
Consider: ½ cup toasted
pecans chopped fine to add to the outside to the cake, or toasted coconut
State Fair Update and Directions
For a bundt pan: grease (butter flavored shortening) and dust with flour. Tap out excess flour. Set aside.
Make recipe as listed. Only fill bundt pan 3/4 full or just a bit beyond 1/2 full with batter… you will have some extra batter. Either toss out the extra or make a small little cake… but whatever you do-do not fill the bundt pan with all the batter.
Bake bundt pan cake for 55-60 minutes, at 350 on the middle rack of the oven. Test cake in center with a long wooden skewer. No wet batter should be on the skewer… only moist crumbs-if any.
Once baked-let cake rest for 5 minutes in the pan, then carefully turn out cake onto a cooling rack.
Once cooled to room temperature-frost cake using a piping bag and decorator tip. I simply followed the creases of the bundt pan-adding frosting stripes. Top with remaining chopped toasted pecans and then refrigerate, covered until ready to serve. This is a terrific make-ahead cake.
For
Robin’s Egg Colored Frosting: Add one drop of blue food coloring gel at a time, until desired
color is reached.
For
the Speckled Egg Frosting: Use 1 teaspoon
cocoa powder, 1-2 drops of vanilla until a paste forms. Using a new kid’s toothbrush (purchased mine
from the dollar store) Sprtiz the cake with the vanilla/cocoa paste. PRACTICE on a piece of parchment before
trying on the finished cake. Be sure you
are happy with the consistency and pattern of the spritzing. You can also
purchase a food-safe brush to apply-found in the cake decorating section of
most craft stores.
Bird’s Nest:
Toasted Kataifi dough, (finely shredded phyllo dough) found
in international grocery stores, Greek grocers.
In Cincinnati, I purchased
mine in the frozen section of Halal Grocery in West Chester, Ohio. For sale at Jungle Jim’s also.
Thaw dough, keeping dough
moist while working. Form into nests on a lined baking sheet. Drizzle with melted butter and sugar cinnamon
if desired. Bake at 350 degrees until
lightly browned. Allow to cool
completely before topping with candies or placing on a finished cake.
Baby Candy Birds:
Jordan Almonds
Royal Icing:
2 Tablespoons meringue powder
1 cup confectioner’s sugar
½ teaspoon water, adding ½ teaspoon at a time until a flow
able paste forms. Add food gel coloring.
I purchased small candy eyes- from Cincinnati Cake and Candy,
Reading, Ohio.


THE DETAILED HOW-TO:
Pre-heat the oven, 350 degrees. …It’s
always a great place to start.
Cakes are always baked on the center rack…so look inside and if you
need to adjust your racks. Adjust them
before the oven is hot.
If you’ve ever had a cake get over
done, or dried out…it might have been because the cake was baking too close to
the heat…on a lower rack.
Prepare your pans.
Use parchment to line the bottom…why?
The cake might not come out of the pan if you try to skip the
parchment...this cake has plenty of sticky goodness in it…
I took a photo of the pan just after
I removed the cake…if the parchment paper wasn’t in there…there is a pretty
good chance that the little bit of sticking would have been a whole lot…
Good news… they sell pre-cut
parchment rounds. If you can’t stand the
thought of cutting out parchment rounds…consider picking some up… I do!
If cutting rounds out, old school
style, simply lay the pan on the parchment paper, trace the pan shape and then
cut. If you are new to parchment paper,
it is usually found in the aisle at the grocery near the aluminum foil and
plastic wraps.
Get your ingredients ready…
Toast the pecans. Wondering about toasted vs. raw nuts?? …toasting
nuts for any recipe add tons of flavor and makes everything taste better…
If you don’t believe me… taste a walnut that is raw, untoasted and
then try one that has been lightly toasted for 7 minutes… the taste is
dramatically different and often is the difference in baking competitions. Toast the nuts 5-7 minutes in a 350
oven. Let cool and then chop.
Tip: You can carefully toast pecans in
the microwave. Toast for 1 minute at a
time until the smell nutty. Be careful
to not go too far and over-toast them with this method. I like to use a microwave safe plate, and
gently move the nuts around between heatings. I’m usually happy with 2 minutes
of toasting in my microwave. (All
microwaves are different—so know your appliance)
Carefully measure flour, spices and
baking soda…set aside.
Measure sugar in a separate bowl. Set aside.
Did you know?? Baking is basically like chemistry…so if you
measure correctly…your product will have at least half a chance of turning out
amazing…. Adding too much or not enough, often spells disaster when baking…
Don’t’ worry... You can do it!!
Measure buttermilk and oil. Set aside.
No buttermilk in the house??
Don’t worry. I often don’t have
buttermilk on hand either. A quick fix:
using milk, (whole and 2% work best for this trick)… Add 1 tablespoon of lemon
juice OR vinegar… It sours the milk and gives you faux buttermilk in a pinch.
What kind of oil should you use?? Great question!! Vegetable or canola oil is a great choice
because those oils are flavorless…meaning they don’t impart any unusual flavors
that some other oils (like olive oil) might.
Beat eggs, sugar, banana, vanilla and
pineapple with juice, using the electric mixer.
Add the flour mixture, a little at a
time. Stop to scrape down the sides once. Alternate adding the flour with the
oil/buttermilk mixture. Stop mixing once the flour is incorporated.
Fold in the toasted, chopped pecans.
Pour into prepared pans.
Bake 27-30 minutes.
Remove cakes from the pans after 5
minutes. Remove parchment paper and let
cool.
Frosting the cakes:
Add frosting in between each cake
layer.

Give the cake a crumb coat… lightly
frost the whole cake. Then put the cake
in the refrigerator for about an hour… go relax… letting the cake firm up in
the refrigerator makes frosting it much easier.
After an hour the frosting is a
little chilled and acts like a glue holding the cake together better… which
helps the layers to not slide around and you will be able to add the nuts
without the cake falling off the plate…

Finish the cake with a final frosting
and coat the sides with chopped toasted nuts.
To add nuts, hold the cake at a
slight angle over a rimmed baking sheet that has the chopped nuts waiting. Gently press the nuts onto the sides of the
cake. Nuts that do not adhere to the
cake will fall back onto the baking sheet.
Repeat and rotate the cake until the sides of the cake are coated with
chopped nuts.

Bird’s Nest:
I used shredded Phyllo dough, known
as Kataifi Dough.
It comes frozen, thaw in the
refrigerator, keep it moist with a damp paper towel white working with it.
On a parchment lined baking sheet, I
made small and medium sized “nests”.
Taking 6 inch lengths of the shredded
phyllo, I made them into what looked like nests.
I wanted them to look realistic, so I
lifted/fluffed them with a fork.
Drizzled with melted butter mixed with 1 teaspoon sugar and a pinch of
cinnamon. Bake in a 350 degree oven on
the middle rack, checking after 10 minutes, and then every 2-3 minutes until
the desired toasty brown-ness is achieved.
They made the cutest little nests.
Small one’s for cupcakes and large as a cake topper for the hummingbird
cake.


Baby Birds and Frosting:
For
Robin’s Egg Colored Frosting: Add one drop of blue food coloring gel at a time, until desired
color is reached.
For
the Speckled Egg Frosting: Use 1 teaspoon
cocoa powder, 1-2 drops of vanilla until a paste forms. Using a new child-size toothbrush (purchased
mine from the dollar store) Sprtiz the
cake with the vanilla/cocoa paste.
PRACTICE on a piece of parchment before trying on the finished
cake. Be sure you are happy with the
consistency and pattern of the spritzing. You can also purchase a food-safe
brush to apply speckles, found in the cake decorating section of most craft
stores.
Baby Candy Birds:
Jordan Almonds
Royal Icing:
2 Tablespoons meringue powder
1 cup confectioner’s sugar
½ teaspoon water, adding ½ teaspoon at a time until a flow
able paste forms. Add food gel coloring.
I purchased small candy eyes- from Cincinnati Cake and Candy,
Reading, Ohio.
1 cup confectioner’s sugar
½ teaspoon water, adding ½ teaspoon at a time until a flow-able paste forms. Add food gel coloring.
I purchased small candy eyes- from Cincinnati Cake and Candy,
Reading, Ohio.
Using a disposable decorator bag,
Yellow for beak- small leaf tip
Black for eyes- I used super-black gel coloring, small 1
writing tip…I did not have to squeeze, simply dotted the eyes, with the tip.
I used uncolored royal icing like glue to adhere the store-bought candy eyes... I cannot decide which bird eyes I prefer...they're both pretty cute.


Bulls-Eye
Caramel Pecan Pie
Karri Perry, BlueRibbonKitchnen.blogspot.com
Blue Ribbon Kitchen
Baking temp: 350
Time: 50-55 minutes
Yields: 9-inch pie
Pie Dough—or
use a store-bought pre-made crust
2 cups all purpose flour
2 Tbsp sugar
1 tsp salt
3 Tbsp Crisco-either butter flavor or original is fine
8 Tbsp (1 stick) unsalted butter
¼ cup- plus 2 Tbs ice cold water and vodka mixed 50/50
Filling
15-20 unwrapped Goetez ‘s Bull’s-eye Caramels
½ cup dark brown sugar
½ cup light brown sugar
½ cup light corn syrup
¼ cup dark corn syrup
4 TBS butter melted
2 tsp vanilla extract
3 large eggs
¼ tsp salt
½ cup chopped toasted pecans
2/3 cup un-toasted whole-unblemished pecans for edging pie-decoration
is optional
Step 1: Mix together flour, sugar and salt, set aside. Make pie dough by cutting in (using a pastry
cutter or food processor) butter, shortening and lard into the flour, sugar and
salt. Add liquid a little at a time…Once
dough comes together, shape into 2 equal disks and let rest, covered tightly,
at least one hour in the refrigerator. (Only one disk of dough is used for this
pie)
Step 2: Roll out 1 dough round to ¼ inch thick, fill pie plate.
Place Bull’s-eye caramels in the pie shell in one even layer.
Step 3: Whisk eggs, sugar, corn syrup, melted butter, extract,
salt and vanilla together. Fold in
chopped toasted pecans.
Step 4: Fill pie shell, covering the caramels with pecan mixture. Top with whole pecans around edges. Add dough cut-outs in decorative shapes if
desired.
Step 5: Bake in preheated 350-degree oven, on the lowest rack for
55-60 minutes or until filling is set. Allow
to cool before serving.

Caramel-Filled
Cupcakes
Karri Perry, BlueRibbonKitchnen.blogspot.com
Blue Ribbon Kitchen
Baking temp: 350
Time: 50-55 minutes
24 cupcakes
Make 24
yellow cupcakes. Boxed mix is fine.
Caramel Filling
20 unwrapped Goetez ‘s Bull’s-eye Caramels
2 Tablespoons dark corn syrup
1 Tablespoon evaporated milk
1 tsp vanilla extract
1/8 tsp salt
Topping:
Vanilla Frosting (store-bought) OR:
2 sticks softened butter
5-6 cups confectioner’s sugar
½ teaspoon salt
1-2 Tablespoon heavy whipping cream- more or less to reach desired
consistency.
1 tsp vanilla extract
Prepared Caramel Corn
Step 1: prepare cupcakes, let cool.
Step 2: In a small, non-stick skillet, add corn syrup, evaporated
milk and salt. Add the unwrapped
Goetze’s Bulls-Eye caramels. On low
heat, begin to melt the candies. Stir
often. Once caramels are melted, remove
from heat to cool. If mixture is too
thick, add 1-3 tablespoons of evaporated milk to thin.
Step 3: Using an apple
corer, remove a small amount of cake from the center of each cupcake.
Step 4: Fill a piping bag with the cooled caramel sauce. Fill each cupcake with 1-2 teaspoons of
caramel sauce.
Step 5: Make Frosting: Beat the butter on high for 3-4
minutes. Slowly add the sugar, salt and
vanilla. Thin the frosting with the
heavy cream. Frost cupcakes with vanilla
frosting add caramel corn to the top of each cupcake and drizzle with extra
caramel sauce.
No comments:
Post a Comment