Friday, January 31, 2014

CHOCOLATE CREAM PIE...a winner!

If you want to make something so delicious... that friends will ask about it before rsvp-ing...kids will request it instead of birthday cake...and every holiday won't really be a holiday unless it's on the dessert table... then you will want to make this chocolate cream pie.  It is a winner in our home and this pie has a collection of ribbons to it's name too.

Time to roll up your sleeves... (actually, it's quite easy and worth every bit of trouble...no sleeve rolling will be necessary...hooray)
You'll need a baked and cooled curst.  May I recommend my recipe...please feel free to check out PERFECT PIE CRUST 101 ...of course you can use your own pie dough recipe... store bought will get the job done in a pinch too.
The printable recipe follows and below a visual recipe, highlighting the making of one of our all-time family favorites....
Chocolate Cream Pie 

Traditional Crust:

• 1  ¼  cups all purpose     King Arthur Flour

• 1/2 teaspoon salt

• 1 Tablespoon sugar

• 1/4 cup vegetable shortening

• 4 Tablespoons cold unsalted butter

• 1/8  cup ice water

• ¼ chilled vodka


Combine dry ingredients, using a pastry blender cut shortening and butter into the flour.  Add liquid until just combined.  Let dough rest tightly covered in the refrigerator for 2 hours.  Roll out to ¼ inch thick, fill pie plate. Blind bake crust in a 375 degree oven, on lowest rack, until golden, about 20-25 minutes.  Remove any parchment and pie weights half-way though the bake.  Let cool completely before filling.


Filling:

• 1 Tablespoon unsalted butter-chilled

• 2 Baker’s Chocolate- semi sweet bars (4 ounces each)-chopped

• 2 teaspoons vanilla extract

***

• 2/3 cup granulated sugar

• 3 tablespoons cornstarch

• ½ teaspoon instant espresso powder

• 2 tablespoons Hershey’s    Special Dark Cocoa Powder

• ¼ teaspoon salt

• 1 cup heavy cream

• 2 cups 2% milk

• 3 large egg yolks


Directions:


In a large bowl, add the chopped chocolate, vanilla and butter.  Set aside.


In a medium saucepan off of the heat, whisk together the sugar, cornstarch, espresso powder, salt and cocoa powders.  Stir in the cream and milk.  Add the egg yolks and stir well.


Place the saucepan over medium heat, stir constantly.  The mixture will begin to thicken as it is heated.  Bring to a boil, whisking constantly.  Boil for one minute.


Remove the pan from the heat and pour over the waiting bowl of chocolate, butter and vanilla.


Stir until all of the chocolate has melted and the mixture is glossy and smooth.


Pour chocolate filling into a prepared pie crust.  If necessary smooth the chocolate with an off-set spatula.


Let pie cool for 20 minutes, before chilling in the refrigerator for at least 4 hours, overnight is best for a well set pie.


Topping:

• 1 ½ cup heavy cream

• ¼ cup confectioner’s sugar

• ½ teaspoon vanilla extract


Place heavy whipping cream into a medium bowl with vanilla and sugar.  Mix on low for 3 minutes, increasing speed until thickened.  Fill a piping bag with a decorative tip and pipe whipped cream onto pie.


Here are the ingredients...
Chop the chocolate, add butter and vanilla to a large bowl, set aside.
 Off heat, mix cornstarch, salt sugar and cocoa & espresso powder.
 Add cream and milk
 Add egg yolks
Combine...look how smooth...
 Bring it to a boil, it will look like this...let it bubble for 1 minute and KEEP stirring.
Pour the hot chocolate over the chopped chocolate/butter/vanilla that is waiting in the wings 


Mix until shiny and gorgeous, (Whoever licks the bowl = LUCKY) pour into prepared pie crust

Smooth the top with an off-set spatula or the back of a spoon
  Let chill at least 3 hours, up to overnight ...I don't cover it...I have found that as long as my refrigerator is free from any strong smelling foods (like onions, fish) the pie sets up perfectly and there isn't any trouble with plastic wrap blemishing the top... in the past, when I tried to cover it...my pie ended up with some issues...


Chocolate Cream Pie...  you can pipe on whipped cream, spoon on whipped cream... old fashioned or "traditional" calls for a meringue topping...I love a whipped cream topping with chocolate curls... do what you like best.  Enjoy!


Thursday, January 30, 2014

FRILLY VINTAGE DESK

Found in a thrift store...
she was a broken down relic from long ago...
but she had class, floral carvings...so feminine and sweet, 
deep drawers, dove-tailed finishes, 
original handles and knobs...


Well, 
the truth is, she had me at "relic"
..she was covered in an unsightly dark brown finish...
I just knew she could be saved....
or at least that's what I was hoping for... 
I am always hoping they can be saved.
I couldn't leave her behind...so naturally I brought her home.

I cleaned her up...
I decided I would leave the top a natural wood, 
finished with wax and painted the rest.

I think she turned out quite lovely.  
She graces the front room of our home...
still waiting for someone (ahem, me... I suppose)
 to sit down and write some letters... 
I think I should get to that right away!
For this project I used:
Elmer's Wood Filler from Lowe's/HomeDepot
CitrisStrip-to remove the varnish/stain on the top only
SherwinWilliams paint: Color: Creamy
Brown Glaze: chocolate color from Lowe's
Minwax Stain: Walnut and Provincial...
I think I mixed the colors to get the 
tone I wanted.
MinWax and Briwax  finishing wax
200 grit sandpaper
Some of my favorite little people, 
as photographed by my very talented sister-in-law.

time to get writing....


Wednesday, January 29, 2014

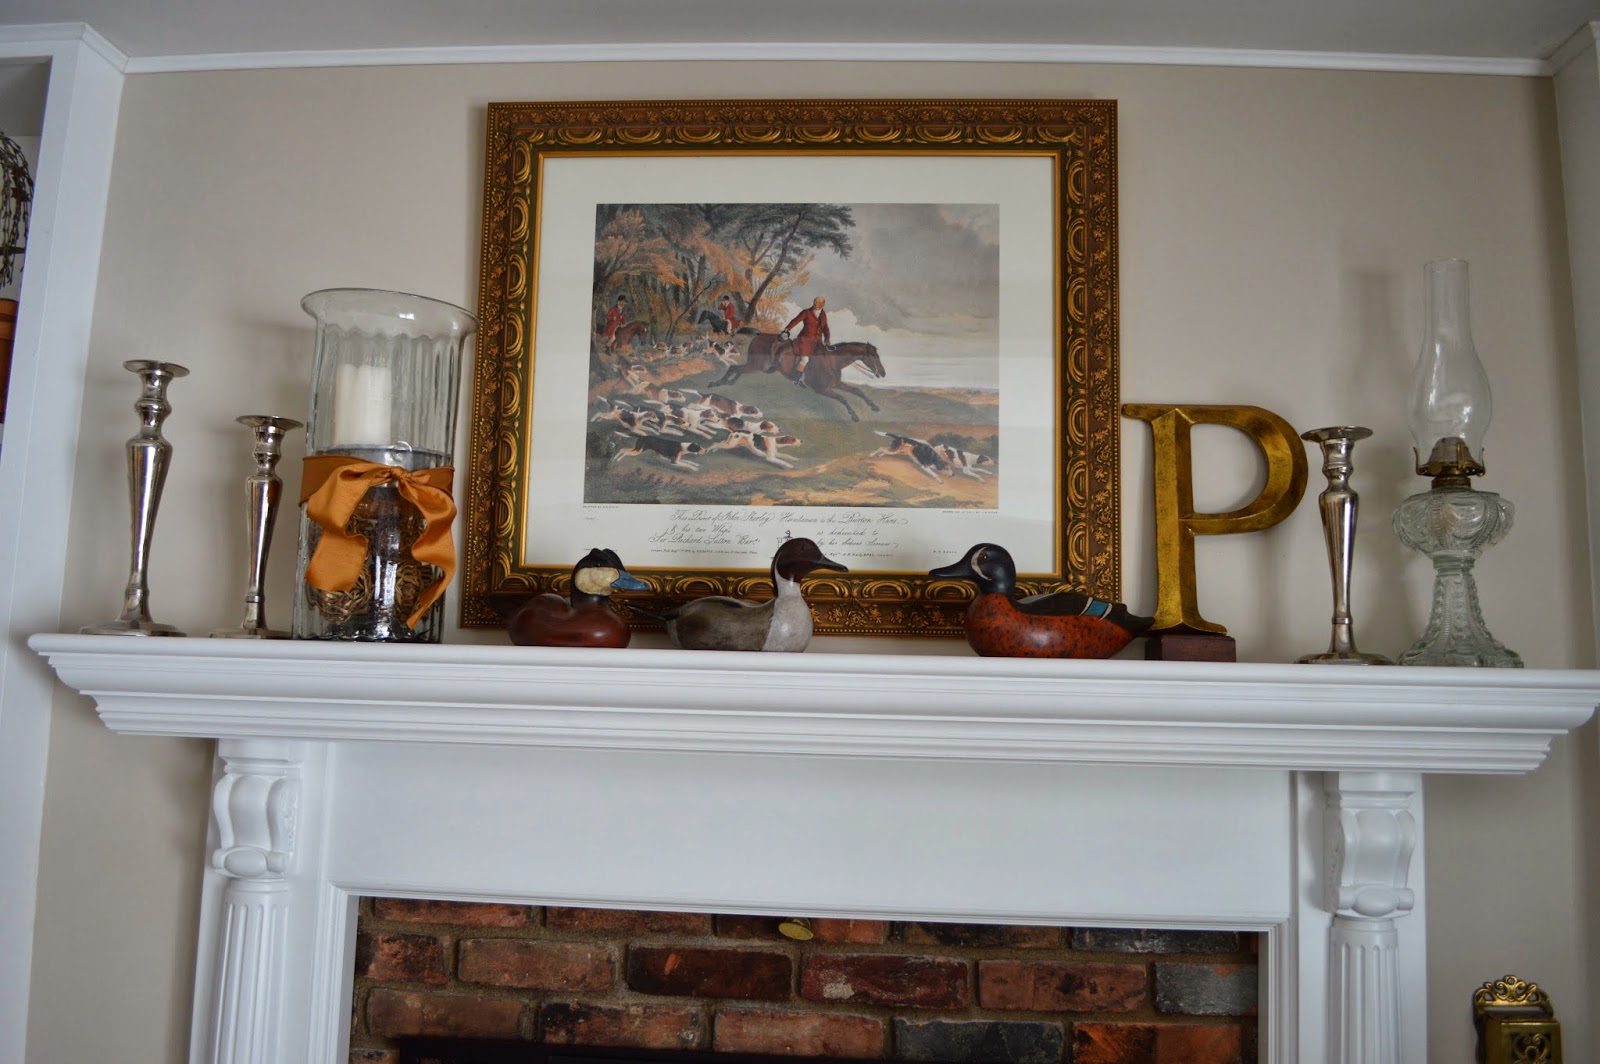
STYLING AN EVERYDAY MANTEL

After the Christmas garlands and glittery decorations have all been boxed up... it's time for an everyday sort of mantle look... at least for me...
I usually change the mantel up seasonally...so moving from autumn to Christmas is usually fun and not too hard to do, with so much to use for decorating... I get stumped in the period right after Christmas...it's too soon to really do Easter or springtime motifs... so I like to do an "everyday" sort of look... A look that plays off the colors in the room and the overall look of the room.  For me the goal is to have the mantel be a focal point, but not stand out too much, I like the room to blend...effortlessly...or at least that is the goal!
I started with a blank canvas; a plain mantle.  If you have not seen the before and after of the fireplace blog entry... it's worth a visit, just to see the change. Fireplace Makeover
The rug (first photo) in the family room is from Ballard Designs (The Catherine, 2013), I am planning to use the subtle greys, tans and honey colors that are in the rug for the mantle...I hope it will work with the wall color...
Artwork is usually the first accessory.  It needs to be something you like to look at first... and the right size.  Whatever artwork you choose, it should fill the space nicely, but not be too large and overwhelm the space.  The biggest key with artwork over a mantel is not too tiny and not too large... "just right" in the words of Goldilocks...  Even doing a pair of medium sized pieced would work, or layering them one slightly in front of the other could also work.  Obviously, everyone who has a fireplace mantel will be dealing with varied sizes of wall space, ceiling heights... choose the best fit for your home.  Once your artwork is up, be sure not to block it with tall items, taller items will go to the sides so the artwork can be seen.  Smaller items can be layered in front of the artwork. 
Decorating works best is odd numbers... so try to work in grouping of three or five.

Here, I added candle sticks for height and a tall oil lamp on each side.  These flank the artwork, farming it and not getting in the way of seeing the art either.  Three items on each side...similar in color, a little silver and glass to add shine--on both sides

  About TVs above the mantle... I know lots of folks put the TV above the fireplace... I considered it too... I don't love it there for two reasons... I don't normally look that high to watch TV, so it doesn't work for me in that respect.  Secondly, I think it is really hard to make a TV look stylish in general...on the mantle it's out there, there is no hiding it. If it's on, it's colorful, loud and busy as the focal point or if it's off, it becomes a large dark box...both of which are hard to get right in the décor department... So for those reasons I kept our TV out of sight in a piece of furniture.  It's a really tough decorating dilemma...

Try adding a few stepped down pieces to add a layer and interest.  I added a "P" and three decoys in the same color pallet to tie in with the overall look.  The "P" was sitting a little low, so I added a wooden block to raise it up...no one will see it once the mantle is finished. (Shhh, don't tell)
I added a little texture and something from nature by adding the dried berries in the honey-brown colored crock.  I added the candles too.
All the these items were already in my home.  Try to shop in your home first, you may be surprised by the items that you can pull together and give them a new life on the mantel.  I did mix silver and gold tones, (artwork frame, letter "P" & candlesticks) I think it works in this instance, but too much of either can be too flashy on a mantle...unless of course it's Christmas...then all bets are off! 

Don't be afraid to try new things, add art, layer items, add interest and texture, work in odd numbers, add something from nature...  ~Well done!


FIREPLACE MAKEOVER; The making of a mantel

I am putting together a simple how-to on decorating a mantel... BUT FIRST... I thought seeing the transformation of our fireplace and mantel would be a great starting point.  The How-To on decorating your mantel will be posted shortly... This is the Before and After of our fireplace....a makeover....I love a good makeover, don't you?
BEFORE fireplace and built-ins

AFTER fireplace and built-ins
  We first moved into out home in the spring of 2004.  I can't believe it took me until 2009 to update the 1976 wall to ceiling fireplace in the family room.  It didn't look terrible, just not my style and definitely dated, much too dark for me.  I don't have great before pictures... this one above is from a Christmas that captures the dark built-ins and the big chunky, rustic mantel --not my style, but I was trying to make it work.  I think a lot of late seventies through mid eighties era homes have this floor to ceiling fireplace style...so much can be done to update it, especially if it's too dark or too much brick to work with.

One day at the hardware store...

While browsing the aisles of Lowe's, quite by accident, I came across mantels...(This is how all really good home improvement stories must start, right?)  They sell traditional, DIY mantles and fireplace surrounds, how did I not know about this?

They can be made as plain or as fancy as you choose.  You pick out the style, purchase each piece and assemble them around your fireplace.

 I was so excited... until that point I had no idea how easy it could be...before that I had visions of contractors and bids...lots of time and inconvenience; all of which kept me from really tackling this project.  It turned out to be a very easy project.

 ...Nothing is more inconvenient than living with things you do not like...this project took a very little bit a time and a can of paint to totally change it's look...and my disposition about the whole room.

 A piece of drywall over furring strips allowed us to cover much of the brick.  We left some brick showing around the fireplace opening and the hearth.  We added white molding trim at the ceiling.

I love white painted trim and mill work --so the built in book cases were painted white, along with the wood beams in the family room... it really brightened up the room.  It took two-three coats of Zinsser's Perma-White semi-gloss paint to cover the dark wood.  The paint is a primer and paint all in one, it stays white, does not yellow, I use it throughout the house on all the doors and trim...that way I always know what color I used...it makes touching up nicks in the wood a breeze.  I am a big fan of this paint.  Another DIY-er was in the painting department one day and she told me all about this fantastic product... It really is a great product and I use it all the time. Perma-White Paint info...by the way, if you would want this paint tinted a color, they can do that too --I just always use it in white.
The fireplace makeover took about a week...(You could absolutely do it over a weekend-- (we had two small kids at the time and if I recall correctly, a little person had a bad cold ...so that slowed us down...we worked on it in the evenings when the kids were asleep)  At the same time, I painted the family room walls and trim too, so the overall room took about two weeks to button up.
Already a BIG improvement.
I got rid of the brass and glass fireplace cover... replaced it with a black fireplace screen that suited our look...they sell these all over... our new and improved screen is from Target.  You can see the new screen in the after photo below.
And Today...
And finally...a few more photos... it is after all, a successful makeover and a very happy ending to the dark, 1970's fireplace...

Do you need tips or tricks for decorating your own mantel??  
Visit How to Style an Everyday Mantel post for lots of easy DIY info.