Monday, June 30, 2014

S'MORES PARTY

It's S'MORE fun with friends and neighbors!
Summer is well underway, so we decided to have our neighbors down for a S'more party. We picked a low-key Sunday evening to host our event.  I love the less formal, more casual way a Sunday night feels.  In the summer, it's a great way to wind down from the busy weekend activities.  It's just so hard to say good-bye to a fun filled weekend sometimes, so putting something extra special at the end of it, makes getting the work week started a little easier, (provided you don't stay out too late).

THE S'MORES BAR
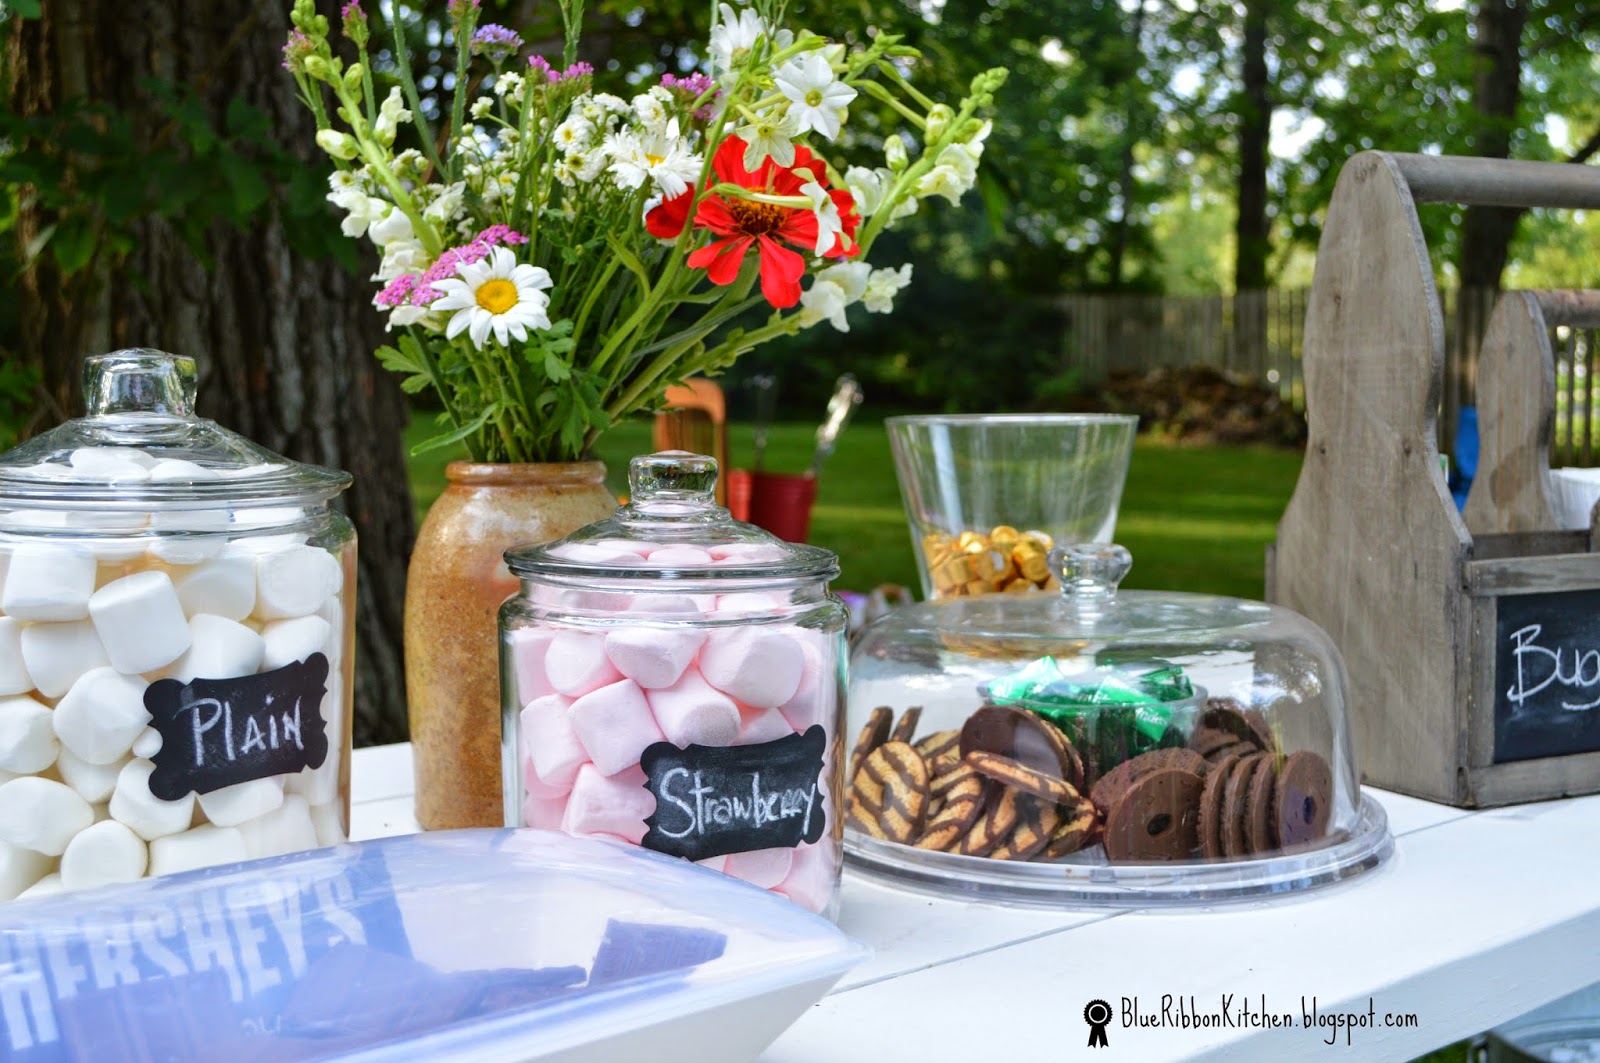
We served the old-standby...."the Original" s'more with graham crackers, toasted marshmallow and milk chocolate... We added a few "fancy" s'mores  in the lineup too.
 We offered:
The "Berry Best" a strawberry toasted marshmallow with chocolate.
The "Grasshopper" a s'more with chocolate graham cracker and Andes mints
The "Caramel Delight" a cinnamon graham cracker with a caramel toasted marshmallow.... We skipped "The Elvis" this time, since we were not sure of any possible food allergies... the Elvis is a s'more with a peanut butter cup and a banana slice.... very delicious.
Here are some photos from last summer's s'more party too... with The Elvis.
The s'mores were a hit and everyone had fun trying the different flavor combinations.
Seeing the kids play, catching up with our friends on all the summertime plans and adventures we've had so far and discussing those adventures that are still to come...It's what summertime is made for...
Using lidded cracker jars, I was able to keep the "gourmet" ingredients organized (and bug free before the party started)  Once our guests arrived we took the lids off and everyone could dig in.
At Hobby Lobby I picked up vinyl chalkboard stickers.... they adhere to the glass, you can write on them with chalk and they peel off with no sticky residue...AND if you keep the pages they come on they are reusable too!!  What a great invention--genius!!

The warm weather had me  a little concerned about the chocolate... I used freezable trays to serve the chocolate on...it kept everything nice and cool.
I made our invitations on PicMonkey, the kids were so excited to deliver them throughout the neighborhood.

If you  plan to host a S'mores party
 (Which I HIGHLY recommend), 
here are some tips and tricks I've gathered:

S'MORE PARTY TIPS

FIRE:  Be sure to let your fire pit or campfire settle, it's really hard to stand around a blazing inferno and lightly toast marshmallows, especially in the heat and humidity of the summer months.  Be sure to get the fire started about an hour or so before guests arrive.

SKEWERS:  Have plenty of skewers or sticks to accommodate multiple marshmallow toasters.  Be sure to have a metal can or container to place hot sticks inside.

STICKY HANDS: are a guarantee with a s'more party-- I liked having baby wipes available for easy clean-up.

MENU:  Make a menu, it doesn't have to be fancy or framed...but its fun to create new flavors for s'mores and the guests really enjoyed trying the recipes out.  Be creative, Pinterest was full of great ideas.

BUGS:  It's nice to have citronella candles burning and bug spray available for guests.  I am a mosquitoes' favorites meal, so I am well aware of the importance of being prepared.

KIDS: We had about 20 kids in our backyard, making s'mores and frolicking with friends...plan ahead and have balls, hula hoops and other fun outside activities available to keep them busy when they are not making s'mores.

ORGANIZATION:  Lidded glass jars were a great choice in keeping things organized, bug free and fresh...there's nothing worse than stale marshmallows!

TAKE IT OFF:  Unwrapping the chocolates and breaking the graham crackers in half  BEFORE guests arrive, makes assembling s'mores a snap.  Any pre-party prep you can manage ahead of time, makes for a smooth running party-- this is true for ALL occasions!

DRINKS:  Guests can get very thirsty playing and eating s'mores, so be sure to have plenty of drinks  We used a galvanized tub filled with ice and bottled waters... easy, accessible and perfect for a warm summer evening.

Wishing you lots S'MORE fun this summer!!!


Saturday, June 14, 2014

THE secret to BLUE RIBBON STRAWBERRY JAMS & PRESERVES

STRAWBERRY SEASON IS HERE!

One of our MOST FAVORITE summertime, or nearly summertime traditions....is picking strawberries and making strawberry jam and preserves.  Nothing tastes better than fresh, homemade strawberry jam.
We love the farm and all the beautiful berries. The trip out to the country is not too far, and the scenery is a nice change of pace.  The newly planted fields are a bright green and the sky is so blue in the early morning.
We try to go strawberry picking as close to the season's opening day as possible to maximize on the biggest berries.  The season usually lasts about two weeks depending on how many pickers are picking and what the weather is like.  If we get a stretch of warm, sunny weather the berries ripen a little faster and the the season is over a little sooner.
Our family thinks its important to taste-test the berries...preferably in the field, just as it's picked...Doesn't get much better than that!

THE SECRET:

The secret to blue ribbon strawberry jams and preserves?!? Well, it's not really a secret at all... It really comes down to using the very best berries available and following the directions on the Sure-Jell recipe booklet --exactly.  Exact measurements are a must for perfectly set jams and jellies.  That's it, so simple right?
The secret ingredient is: perfectly ripe strawberries and sugar... that's the magic. ...the real secret to great jams, jelly and preserves is in the measuring of the ingredients.  

For making jam or preserves I follow the exact directions on the Sure-Jell instruction booklet.  (It comes inside each and every little box of Sure-Jell.)  Measuring carefully AND having fresh sweet, ripe (not under-ripe and not over-ripe) berries (or ANY fruit for that matter) will reap the best, most delicious final product.

Sure-Jell is available in the baking or canning aisle of most grocery stores.  Sure-Jell is a natural fruit pectin that helps the jams jellies and preserves set up to the correct consistency.

HEY SUGAR...
Yes, there is an obscene amount of sugar in traditional jams and preserves.  Jams, jellies and preserves are meant to be sweet; it's a condiment, not a food group. Try not to be too upset by the volume of sugar in each batch.  For every 5 cups of crushed berries there is 7 cups of granulated sugar....  Just remember, you are eating ONLY a fraction of the total amount of sugar in each batch.  We use about a tablespoon or so of jam on an individual PB&J sandwich. By making your own jam, you control the quality of the berries and you'll know exactly what's in each jar, no worries about other chemicals, pesticides or additional preservatives.  
For sugar-free or jam with less sugar, Sure-Jell in the pink box can be used.  I cannot vouch for the pink box Sure-Jell or how it tastes, I've always made the traditional kind with sugar.  Visit www.SUREJELL.com for more product information.

JAMS, PRESERVES and JELLY, What's the DIFFERENCE?

Jams are crushed fruit and the juice that is extracted from the crushing... We use a potato masher for maximum crushing.  Jams contain both the crushed fruit and jelled juices.  The jam, once set is like a solid, but easily spreads with a knife.

Preserves are when the shape of the fruit is "preserved" in the canning process.  For this method I crush a few handfuls of berries to get some body and  some juice, the remaining berries are left whole and cook down, holding their original shape.  The whole berries soften, but for the most part they retain a lot of their original shape.

Jelly is made using only the juice of the fruit.  Once the fruit is crushed, cheesecloth is used to separate the fruit pulp from the juice.  Once pectin (Sure-Jell) is added to the fruit juice and heated, you'll end up with a jelly.  The hallmark of a jelly- is a clear, transparent jelled product without any cloudiness or fruit pulp.

For more information on canning techniques, proper storage and food safe practices, consult the Ball Blue Book for canning.  Available where canning jars are sold.

HELPFUL TIPS

Over the years, I learned a thing or two about making strawberry jam, so here is a listing of a few helpful tips to make the experience go smoothly:

 Get to the fields early, the fruit will have rested overnight and be at it's freshest in the early morning.  The cool morning air makes the chore of picking a much more enjoyable task.

To the filed or berry patch, take hand wipes or a container of soapy water and a washcloth. All the taste testing and picking can make for a messy and sticky ride home if you are not prepared.

  In advance of berry picking day, get your jars cleaned and have enough new lids ready for when it's time to begin canning.  Counting the jars can help you decide how many berries to pick.  It's easy to get carried away in a field full or gorgeous strawberries!
 Based on the amount of jars you have, purchase enough sugar and pectin to get the job done.  there is nothing worse than needing to run to the store in the middle of canning.

Keep things organized, clean and have plenty of fresh clean towels or paper towels at the ready.  Hot jam can be a drippy mess, but if you are prepared in advance, you can manage even to biggest strawberry spill.

Measure exactly.

Don't fill the jars too full.  Filling the jars to the lowest ring at the mouth of the jar is far enough.  Consult the Ball Blue Book, for more details.


Have fun... you'll be enjoying your efforts all year long!